Course Aim: To develop your ability to independently undertake routine maintenance and to analyse faults in personal computers.
Pre-requisite: Computer Servicing I (or equivalent).
COURSE CONTENT
The emphasis is on personal computers (ie. PCs) and while the course is relevant to all types of PCs it is particularly relevant to IBM and IBM compatible systems. This is because these are the most popular systems used in business today.
There are ten (10) lessons in total, as outlined below:
- Introduction to hardware components.
- Basic Diagnostic Equipment
- Electric Circuits & Components
- Problem Solving & Fault Analysis
- Diagnostic Testing A (Self Tests & Diagnostic Cards).
- Diagnostic Testing B (System Board & Memory Tests).
- Software maintenance and troubleshooting.
- Disk drives and CD-ROM.
- Video and Audio Systems
- Developing a Maintenance Program
AIMS
- Develop procedures for routine hardware maintenance of a computer system
- Develop procedures for routine software maintenance of a computer system
- Evaluate the appropriateness of different computer systems for different applications.
- Determine different sources of faulty hardware operation in a PC computer system
- Determine different sources of faulty software operation in a PC computer system
Some of what you will do in this course:
- Explain how to dismantle a Personal Computer
- Explain how to reassemble a dismantled personal computer
- Analyse potential hardware faults that may occur in different computer systems.
- Determine likely causes of potential hardware faults, including faulty equipment, damage to equipment
- Analyse potential software faults that may occur in different computer systems.
- Determine likely causes of potential software faults, including faulty equipment, power surges
- Describe causes of data corruption
- Describe ways of addressing software problems including data corruption.
- Develop a procedure for routine maintenance of a specific computer system.
- Demonstrate a basic understanding of three different operating systems
- Outline the role of ROM BIOS.
- Explain a range of common computer hardware faults which are easily repaired by a technician.
- Test cables for faulty operation
- Explain faults which can occur with a VDU
- Explain how to use several different hardware diagnostic tools
- Determine procedures to minimise risk of computer problems including equipment breakdowns and data loss.
- Explain a range of common computer software faults which are easily repaired by a technician.
- Test different software for faulty operation
- Explain how to use several different software diagnostic tools
Extract from Course Notes:
The urge to upgrade, repair or just tinker with the insides of a computer system can be quite strong in some people. A comparison can be made between working on the family car and working on the family computer. Initially both tasks might seem daunting however, with experience and a little guidance most repairs can be undertaken, hardware components installed or clock speeds souped up or adjusted for optimal performance.
For the first timer, the process can seem to be fraught with danger, and in terms of doing more damage than good it can be. If you follow a few basic steps though you should be able to work quite safely, both from your own and the computers point of view.
Before you begin to handle and work with any computer components it is strongly recommended that you wear an antistatic wrist-strap. This should be clipped onto the bare metal of the computer base. Better still; use an antistatic bench mat as well (for placing your components on). In this case, you connect the wrist-strap cable to the mat and then connect the mat to the computer’s case/chassis. The reason for such protection is that Electrostatic Discharge (ESD) can do serious damage to the PC’s motherboard and expansion cards, with the potential of rendering them non- functional.
Select a clearly defined work area, free of clutter and with plenty of room for laying out components. You will find that a computer has many parts that are quite small and quite similar in design and purpose, but will need to be replaced in an identical manner from which they came in order for the system to work correctly.
Label everything and group the various related components and screws together. The use of Plastic cups to contain smaller pieces is a very good idea.
Plan your disassembly well. Look for all attaching screws or cables. Never force the issue; if something does not want to budge or won’t simply slide out, it is probably caught or still attached by something you have missed. Often, when exasperation sets in, the best ploy is to get up take a deep breath and attack the problem from a different angle.
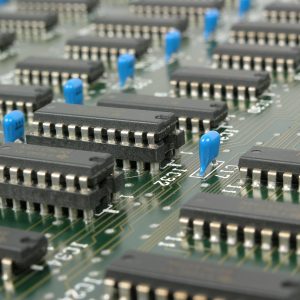
DYNAMIC RANDOM ACCESS MEMORY
DRAM chips are small but normally inexpensive because they usually require only one capacitor and one transistor to represent each bit.
In DRAM chips, the capacitors must receive an electric pulse every 15 milliseconds (ie. hundreds of times a second) to maintain the charge; if this does not happen, it looses the memory until a new charge and new memory is written to the chip.
All current day computers use small boards of dram to supply memory. These boards are called ‘DIMM’ (Dual Inline Memory Module) and ‘SIMM’ (Single Inline Memory Module) modules.
The RAM memory of a computer can be increased either by:
- Replacing current SIMMs or DIMMs with higher spec ones (ie having higher storage capacity).
- Adding more modules to vacant slots on the mother board
Reasons For Adding Memory
Insufficient memory may result in a computer taking a lot of time to perform a task; or perhaps even crashing during a task.
If problems such as this occur; the RAM memory capacity should be increased to, at least, the minimum memory requirements of the application(s) being run – check the literature supplied with software being used.
The computer can also benefit from RAM upgrade if the computer will be using lot of software applications which require a huge amount of memory. For example if you are running applications like Photoshop, Microsoft outlook, Microsoft excel, illustrator all one time then the computer will start freezing due to insufficient RAM.
Problems When Installing Memory
When installing memory, the following problems can occur:
- Damaged chips (when installing individual chips; look carefully at chips before inserting. Never force a chip)
- Damaged SIMM or DIMM modules (as with chips, never force a module into a motherboard. They should easily click into place)
- Inappropriate jumper switch settings
- Electrostatic discharges damaging a chip (hold memory module at the ends only, to avoid contact with the memory chips and the lower connecting edge ‘s gold fingers).
- Compatibility issues. If the motherboard supports dual channel memory, then all modules should be identical i.e. having same speed, same capacity and ideally from the same manufacturer. Meeting these criteria will prevent compatibility issues when installing new or upgrading RAM modules.
- Seating Issues. Incorrect seating of the module(s) in the slot will result in system not seeing it and thus causing an error message when powering up. The module(s) must therefore be perfectly aligned with the slot, both of which are keyed with notches to ensure correct orientation. Then press down the memory module with sufficient force so that the plastic retainer clips lock into position automatically. When the retainer clips are locked into position this will guarantee that the memory module is perfectly seated.
JUMPER SWITCH SETTINGS
A jumper is a tiny electric switch that can turn off or on the flow of electricity within a part of the computer. Jumper switches are commonly found in motherboards, and peripherals such as printers. They are usually plastic covered metal clip that covers two pins protruding from a circuit board.
You will commonly find a number of jumper switches together. The pattern (or configuration) of what is switched on and off, will affect the way in which the system functions.
For example: If the jumpers are configured properly, a printer may work well with a particular system and software. Incorrect jumper settings can cause the printer to not function properly.
HARD DISK UPGRADE
Hard drives capacity can be upgraded in 2 ways.
1. An additional hard disk can be added on to the motherboard via the secondary connection on the IDE/ATA channel ribbon cable. This is the easiest way to increase the computers memory capacity, as the structure and data configuration on the original hard disk need not be adjusted. The jumpers on the back of the new hard disk will require setting in order to identify it as the ‘Slave’ drive. The new hard disk drive should have a printed diagram label attached illustrating all possible jumper configurations. It is important when using IDE/ATA channel hard drives to differentiate between ‘Master’ and ‘Slave’ otherwise the system will not be able to identify the new drive.
Generally the Operating System (Windows XP, etc) and all software applications will be stored on the master drive, with the Slave drive being used to store all additional folders, eg. personal folders etc.
This is extremely useful if the operating system becomes corrupt resulting in a wipe out of all data on the Master drive. Then the other hard disk (Slave) containing all the personal files will still be intact. These are not replaceable if lost whereas the operating system and all the software applications can be reloaded on the computer.
2. The other way to do a hard disk upgrade is to swap the current hard disk for one with a greater memory capacity. This will require transferring all current software and data files from the old hard disk to the new one. To do this, an image is created of the old drive ie an exact copy of everything stored on the drive (known as ghosting the hard drive) and with the use of 3rd party application software designed for this purpose, the image is transferred directly over to the new hard drive in a timely and effective manner. Alternatively the image of the old hard drive could be transferred onto a server’s hard disk if the computer with the old hard drive is currently installed on a Local Area Network (LAN). Then the image could be transferred from the server to another computer on the network with a bigger hard drive capacity.
With regards to option 1 above; Hard Drive capacity can be further improved by utilising the RAID (Redundant Array of Independent Disks) configuration. Once only used on network servers, this configuration is now a possibility for many home/office computers. Essential RAID supporting motherboards lets you two or more hard drives simultaneously to ‘Stripe’ or ‘mirror’ data.
With Striping, also called RAID level 0, the computer treats each hard drive as part of a whole. Two 60GB drives, for example, effectively become a single 120GB drive. Data is then distributed evenly between the drives, resulting in faster read/write performance. The risk is that a single drive failure means that all data is lost.
With Mirroring, or RAID level 1 as it is known, everything you save to the Master (Primary) drive is simultaneously copied to the other hard drive (Slave) in the system. Such duplication offers a high level of data security and reliability but, because the additional drive simply ‘mirrors’ the contents on the Primary drive, you don’t get the benefits of additional storage capacity. However you do have the assurance that if the Primary drive were to crash, resulting Before the RAID configuration can be used the chipset on the motherboard must have RAID Drive controllers installed and with a RAID compatible BIOS (Basic Input Output System). Some motherboards support both Striping and mirroring simultaneously (Level 0 + 1), although for this you would need a grand total of four.